


How and Why You Should Hide Pinnable Images in Your Blog Posts
You spend so much time writing valuable content for your blog so people can read it, but sometimes the inclusion of a lot of pinterest images can be distracting to readers. It can also deter them from reaching the bottom of your post to leave a comment. That’s why it’s so important to hide pinnable images in all of your blog posts! There are several different ways to accomplish this, but the below method is how I prefer to hide my images in posts.
The Why
There are a couple of reasons that bloggers may want to hide pinnable images within a blog post.
- Pinterest images take up a lot of space in a blog post. In order to create an eye-catching pinnable image for Pinterest, you’re going to need one that is vertical and stands out. Putting this kind of image in your blog post though can be distracting to readers. You want you readers to do just that – read! So including a lot of graphics that are meant to act almost like book covers can break up the text and flow of your content.
- Hiding pinnable images in a post allows you to see what type of pin works best among your readers. Let’s say you’ve created three different pinnable images to go along with your blog post. If you place all three of them visibly in your blog post, you’re going to be pulling your readers’ attention away from your content. But, if you hide them, you’re able to see which one resonates more with your readers based on the repins that originate from your post.
The How
- Create and upload your image into your media library as you usually do for any blog post image.
- Switch to the text view in the post creator.
- Insert your image anywhere you like (I typically add mine at the end).
- Add the below code to the beginning and end of the image code of the image you just inserted.
- Switch back to the visual view in the post creator, and voila!
The Code
When I say the word “code,” I’m sure that alone is enough to turn some people away. However, let me assure you, I’m not a coder, nor am I a genius, so if I can tackle this itty-bitty piece of code then you can too. 🙂
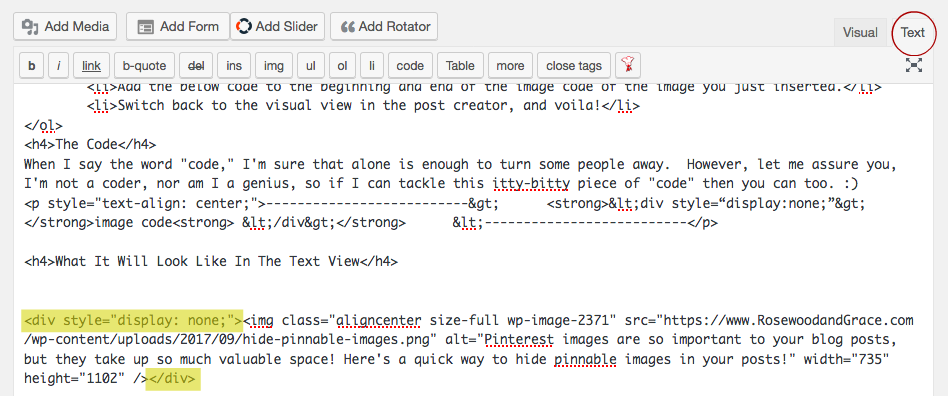
————————–> <div style=“display:none;”> image code </div> <————————–
What It Will Look Like In The Text View

And there you have it! That’s all there is to hiding pinnable images in a blog post! So be sure to save this code somewhere handy so you can reference it often. After a while though, you’ll have it memorized and it’ll be super easy to include in all of your posts. 🙂


Save